Dobby框架源码学习
Dobby框架推出的时间也不短了,从Github提交记录上看最早在17年就有提交了。这期间陆陆续续在使用Dobby框架,虽然对原理有大概的了解,但是还是没有从源码上入手分析,这次想完整的梳理下Dobby的实现流程,也就有了这次的文章。
对于Dobby这类inline hook框架的认识,大多数人都知道它的实现是在hook函数时,修改了函数对应汇编代码的前几行指令实现跳转到自定义函数上的,那么就沿着这个角度先从汇编调试上看看Dobby从我们原始程序的修改
一、从调试角度看Dobby的原理
使用一个最基本的Demo来作为调试对象
注意:这里直接将Dobby源码作用三方库引入,目前Dobby最新Commit无法编译,需要切换到Commit:0932d69c320e786672361ab53825ba8f4245e9d3
对Java_com_example_dobbytest1_MainActivity_stringFromJNI方法的hook,hook后主动回调原始方法
#include <jni.h>
#include <string>
#include "Dobby/include/dobby.h"
#include "logging.h"


extern "C" JNIEXPORT jstring JNICALL
Java_com_example_dobbytest1_MainActivity_stringFromJNI(
        JNIEnv* env,
        jobject /* this */) {
    std::string hello = "no be hooked";
    return env->NewStringUTF(hello.c_str());
}

static jstring (*orgin_Java_com_example_dobbytest1_MainActivity_stringFromJNI)(JNIEnv* env,jobject /* this */);

extern "C" JNIEXPORT jstring JNICALL
new_Java_com_example_dobbytest1_MainActivity_stringFromJNI(
        JNIEnv* env,
        jobject jobject1/* this */) {
    LOGI("be hooked");
    return orgin_Java_com_example_dobbytest1_MainActivity_stringFromJNI(env,jobject1);
}

__attribute__((constructor)) static void ctor() {
    // 构造函数 静态插入hook调用
    // 原函数名
    // 新函数地址
    // 旧函数地址
    DobbyHook((void *) DobbySymbolResolver(NULL, "Java_com_example_dobbytest1_MainActivity_stringFromJNI"),
              (void *) new_Java_com_example_dobbytest1_MainActivity_stringFromJNI,
              (void **) &orgin_Java_com_example_dobbytest1_MainActivity_stringFromJNI
              );
}
可能是由于Android Studio版本太新,没找到在Android Studio上使用lldb调试的方式,我就直接使用命令行来操作了
设备端开启lldb-server并启动App
./lldb-server platform --listen '*:1234' --server本地使用lldb连接
选择调试平台
(lldb) platform select remote-android
  Platform: remote-android
 Connected: no
连接lldb-server创建的端口
(lldb) platform connect connect://:1234
  Platform: remote-android
    Triple: aarch64-unknown-linux-android
OS Version: 30 (4.14.186-perf-g42f990859d35)
  Hostname: localhost
 Connected: yes
WorkingDir: /data/local/tmp
    Kernel: #1 SMP PREEMPT Tue Mar 1 19:09:49 CST 2022
(lldb)
此时设备端会显示Connection established.,接下里就可以attach对应的pid进行调试了
首先确定断点位置,因为代码中是对Java_com_example_dobbytest1_MainActivity_stringFromJNI进行hook,那么可以断点在该方法的首个指令地址
地址计算可以参考下面的方法
- 通过image list -o -f命令获取so的基地址 0x00000070ece49000
- 基地址+偏移=断点地址 0x00000070ece49000+0x000000000000b110=0x70ece54110
0xb110位置断点
(lldb) br set -a 0x70ece54110
Breakpoint 1: address = 0x00000070ece54110
得到结果如下
断点信息
Process 20161 stopped
* thread #1, name = 'mple.dobbytest1', stop reason = breakpoint 1.1
frame #0: 0x00000070ece54110
-> 0x70ece54110: adrp x17, 0
0x70ece54114: add x17, x17, #0x290
0x70ece54118: br x17
0x70ece5411c: mrs x8, TPIDR_EL0
Target 0: (app_process64) stopped.
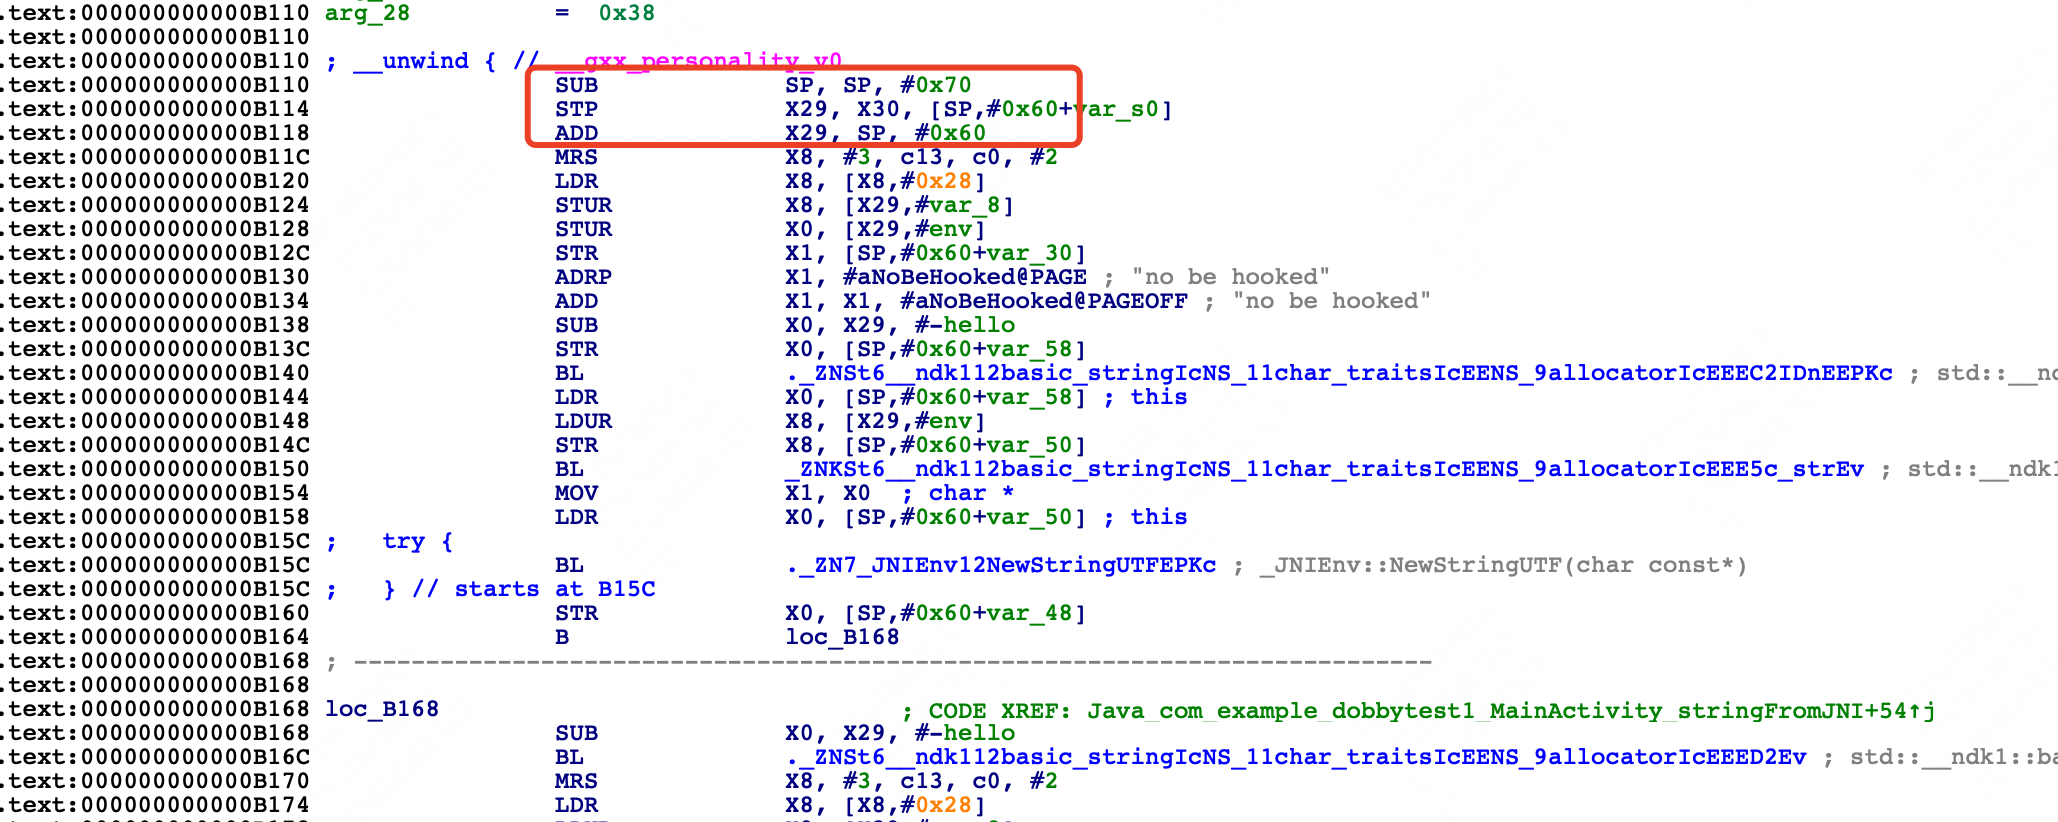
对比原始汇编代码
.text:000000000000B110 SUB SP, SP, #0x70
.text:000000000000B114 STP X29, X30, [SP,#0x60+var_s0]
.text:000000000000B118 ADD X29, SP, #0x60
.text:000000000000B11C MRS X8, #3, c13, c0, #2可以看到Java_com_example_dobbytest1_MainActivity_stringFromJNI函数的头三个指令发生了变化,原本的栈拉伸、寄存器入栈保护等固定指令被替换了,替换成了针对x17地址的跳转指令,看下x17对应的值是什么
Process 20161 stopped
* thread #1, name = 'mple.dobbytest1', stop reason = instruction step over
    frame #0: 0x00000070ece54114
->  0x70ece54114: add    x17, x17, #0x290
    0x70ece54118: br     x17
    0x70ece5411c: mrs    x8, TPIDR_EL0
    0x70ece54120: ldr    x8, [x8, #0x28]
Target 0: (app_process64) stopped.
(lldb) register read x17
     x17 = 0x00000070ece54000
(lldb) n
Process 20161 stopped
* thread #1, name = 'mple.dobbytest1', stop reason = instruction step over
    frame #0: 0x00000070ece54118
->  0x70ece54118: br     x17
    0x70ece5411c: mrs    x8, TPIDR_EL0
    0x70ece54120: ldr    x8, [x8, #0x28]
    0x70ece54124: stur   x8, [x29, #-0x8]
Target 0: (app_process64) stopped.
(lldb) register read x17
     x17 = 0x00000070ece54290
(lldb)
x17对应的值是0x00000070ece54290,偏移是0xb290,也就对应着new_Java_com_example_dobbytest1_MainActivity_stringFromJNI方法
 那么从这里可以看出,Dobby对函数的hook是通过修改原始函数的前三个指令来完成跳转的,那么指令替换的逻辑是什么我们后续在源码分析中继续跟踪,现在接着往下看
在替换函数中最后我们主动回调了原始函数,在0xb2cc的位置可以再下个断点
(lldb) br set -a 0x70ece542cc
Breakpoint 3: address = 0x00000070ece542cc
(lldb) c
Process 20161 resuming
Process 20161 stopped
* thread #1, name = 'mple.dobbytest1', stop reason = breakpoint 3.1
    frame #0: 0x00000070ece542cc
->  0x70ece542cc: blr    x8
    0x70ece542d0: ldp    x29, x30, [sp, #0x10]
    0x70ece542d4: add    sp, sp, #0x20
    0x70ece542d8: ret
Target 0: (app_process64) stopped.
(lldb) s
Process 20161 stopped
* thread #1, name = 'mple.dobbytest1', stop reason = instruction step into
    frame #0: 0x0000007183933000
->  0x7183933000: sub    sp, sp, #0x70
    0x7183933004: stp    x29, x30, [sp, #0x60]
    0x7183933008: add    x29, sp, #0x60
    0x718393300c: ldr    x17, #0x8
Target 0: (app_process64) stopped.
(lldb) s
Process 20161 stopped
* thread #1, name = 'mple.dobbytest1', stop reason = instruction step into
    frame #0: 0x0000007183933004
->  0x7183933004: stp    x29, x30, [sp, #0x60]
    0x7183933008: add    x29, sp, #0x60
    0x718393300c: ldr    x17, #0x8
    0x7183933010: br     x17
Target 0: (app_process64) stopped.
在0xb2cc的位置是跳回到原始函数,从调试信息中可以看到,首先是栈拉伸、寄存器入栈保护
(lldb) s
Process 20161 stopped
* thread #1, name = 'mple.dobbytest1', stop reason = instruction step into
    frame #0: 0x000000718393300c
->  0x718393300c: ldr    x17, #0x8
    0x7183933010: br     x17
    0x7183933014: .long  0xece5411c                ; unknown opcode
    0x7183933018: udf    #0x70
Target 0: (app_process64) stopped.
(lldb) register read x17
     x17 = 0x0000007185f8e970  libc.so`pthread_mutex_unlock
(lldb) s
Process 20161 stopped
* thread #1, name = 'mple.dobbytest1', stop reason = instruction step into
    frame #0: 0x0000007183933010
->  0x7183933010: br     x17
    0x7183933014: .long  0xece5411c                ; unknown opcode
    0x7183933018: udf    #0x70
    0x718393301c: udf    #0x0
Target 0: (app_process64) stopped.
(lldb) register read x17
     x17 = 0x00000070ece5411c
(lldb) s
Process 20161 stopped
* thread #1, name = 'mple.dobbytest1', stop reason = instruction step into
    frame #0: 0x00000070ece5411c
->  0x70ece5411c: mrs    x8, TPIDR_EL0
    0x70ece54120: ldr    x8, [x8, #0x28]
    0x70ece54124: stur   x8, [x29, #-0x8]
    0x70ece54128: stur   x0, [x29, #-0x28]
Target 0: (app_process64) stopped.
可以看到,x17被重新赋予了地址,而这个地址是原始函数的第四行指令,但是这个地址又是怎么被保存下来的呢?同样放在后续源码分析中
在原始函数中继续执行代码会最终走到
Process 20161 stopped
* thread #1, name = 'mple.dobbytest1', stop reason = breakpoint 4.1
    frame #0: 0x00000070ece54188
->  0x70ece54188: ldr    x0, [sp, #0x18]
    0x70ece5418c: ldp    x29, x30, [sp, #0x60]
    0x70ece54190: add    sp, sp, #0x70
    0x70ece54194: ret
Target 0: (app_process64) stopped.
完成寄存器恢复以及栈平衡,接着返回到新函数流程内
Process 20161 stopped
* thread #1, name = 'mple.dobbytest1', stop reason = instruction step into
    frame #0: 0x00000070ece54194
->  0x70ece54194: ret
    0x70ece54198: str    x0, [sp, #0x28]
    0x70ece5419c: mov    w8, w1
    0x70ece541a0: str    w8, [sp, #0x24]
Target 0: (app_process64) stopped.
(lldb) s
Process 20161 stopped
* thread #1, name = 'mple.dobbytest1', stop reason = instruction step into
    frame #0: 0x00000070ece542d0
->  0x70ece542d0: ldp    x29, x30, [sp, #0x10]
    0x70ece542d4: add    sp, sp, #0x20
    0x70ece542d8: ret
    0x70ece542dc: stp    x29, x30, [sp, #-0x10]!
Target 0: (app_process64) stopped.
下面以完整的流程图来展示Dobby inline hook的流程

二、源码分析
源码上从dobby.h的DobbyHook入手,源码实现在
// source/InterceptRouting/Routing/FunctionInlineHook/FunctionInlineHook.cc
PUBLIC int DobbyHook(void *address, dobby_dummy_func_t replace_func, dobby_dummy_func_t *origin_func) {
......

#if defined(ANDROID)
  void *page_align_address = (void *)ALIGN_FLOOR(address, OSMemory::PageSize());
  if (!OSMemory::SetPermission(page_align_address, OSMemory::PageSize(), kReadExecute)) {
    return -1;
  }
#endif

  DEBUG_LOG("----- [DobbyHook:%p] -----", address);

  // check if already register
  auto entry = Interceptor::SharedInstance()->find((addr_t)address);
  if (entry) {
    ERROR_LOG("%p already been hooked.", address);
    return -1;
  }

  entry = new InterceptEntry(kFunctionInlineHook, (addr_t)address);

  auto *routing = new FunctionInlineHookRouting(entry, replace_func);
  routing->Prepare();
  routing->DispatchRouting();

  // set origin func entry with as relocated instructions
  if (origin_func) {
    *origin_func = (dobby_dummy_func_t)entry->relocated_addr;
#if defined(__APPLE__) && defined(__arm64__)
    *origin_func = pac_sign(*origin_func);
#endif
  }

  routing->Commit();

  Interceptor::SharedInstance()->add(entry);

  return 0;
}- 首先会对地址所在的内存页权限进行修改,修改成可读可执行(PROT_READ | PROT_EXEC),这是为了能够修改内存中的代码并且保证系统能够正常执行该段代码
- 以地址创建InterceptEntry对象entry,并用Interceptor管理起来
- 以entry和replace_func创建FunctionInlineHookRouting,并分别调用Prepare、DispatchRouting、Commit
- 如果有origin_func,设置origin_func作为entry的relocated_addr
关键在于第三步FunctionInlineHookRouting对象的处理,FunctionInlineHookRouting,从命名上看是关于inline hook跳转规则的配置。FunctionInlineHookRouting的Prepare函数为空,且父类InterceptRouting的Prepare函数也为空,可以先忽略
主要看下面这个函数DispatchRouting
// source/InterceptRouting/Routing/FunctionInlineHook/RoutingImpl.cc
void FunctionInlineHookRouting::DispatchRouting() {
  BuildRouting();

  // generate relocated code which size == trampoline size
  GenerateRelocatedCode();
}

void FunctionInlineHookRouting::BuildRouting() {
  SetTrampolineTarget((addr_t)replace_func);

  // generate trampoline buffer, run before GenerateRelocatedCode
  addr_t from = entry_->patched_addr;
#if defined(TARGET_ARCH_ARM)
  if (entry_->thumb_mode)
    from += 1;
#endif
  addr_t to = GetTrampolineTarget();
  GenerateTrampolineBuffer(from, to);
}

// source/InterceptRouting/InterceptRouting.cpp
bool InterceptRouting::GenerateTrampolineBuffer(addr_t src, addr_t dst) {
  // if near branch trampoline plugin enabled
  if (RoutingPluginManager::near_branch_trampoline) {
    auto plugin = static_cast<RoutingPluginInterface *>(RoutingPluginManager::near_branch_trampoline);
    if (plugin->GenerateTrampolineBuffer(this, src, dst) == false) {
      DEBUG_LOG("Failed enable near branch trampoline plugin");
    }
  }

  if (GetTrampolineBuffer() == nullptr) {
    auto tramp_buffer = GenerateNormalTrampolineBuffer(src, dst);
    SetTrampolineBuffer(tramp_buffer);
  }
  return true;
}

// source/TrampolineBridge/Trampoline/arm64/trampoline_arm64.cc
CodeBufferBase *GenerateNormalTrampolineBuffer(addr_t from, addr_t to) {
  TurboAssembler turbo_assembler_((void *)from);
#define _ turbo_assembler_.

  uint64_t distance = llabs((int64_t)(from - to));
  uint64_t adrp_range = ((uint64_t)1 << (2 + 19 + 12 - 1));
  if (distance < adrp_range) {
    // adrp, add, br
    _ AdrpAdd(TMP_REG_0, from, to);
    _ br(TMP_REG_0);
    DEBUG_LOG("[trampoline] use [adrp, add, br]");
  } else {
    // ldr, br, branch-address
    CodeGen codegen(&turbo_assembler_);
    codegen.LiteralLdrBranch((uint64_t)to);
    DEBUG_LOG("[trampoline] use [ldr, br, #label]");
  }
#undef _

  // Bind all labels
  turbo_assembler_.RelocBind();

  auto result = turbo_assembler_.GetCodeBuffer()->Copy();
  return result;
}
从BuildRouting函数流程中来看下它做的事,to对应的是replace_func,from对应的是patched_addr,也就是origin_func对应的地址,得到这两个地址之后就调用GenerateNormalTrampolineBuffer生成trampoline_buffer_
可以看到生成了三行指令adrp, add, br,对应了上文调试中origin_func的前三行代码替换后的代码,借助assembler-arm64.h生成buffer,对应到调试指令中
0x70ece54110: adrp   x17, 0
0x70ece54114: add    x17, x17, #0x290
0x70ece54118: br     x17
第一行x17表示当前内存页的地址,0表示origin_func与replace_func地址之间的内存页差值 第二行表示replace_func在当前内存页的偏移量 第三行就是跳转指令
最后会生成这三行跳转指令对应的字节码
BuildRouting生成完Trampoline指令后调用GenerateRelocatedCode
// source/InterceptRouting/InterceptRouting.cpp
bool InterceptRouting::GenerateRelocatedCode() {
  uint32_t tramp_size = GetTrampolineBuffer()->GetBufferSize();
  origin_ = new CodeMemBlock(entry_->patched_addr, tramp_size);
  relocated_ = new CodeMemBlock();

  auto buffer = (void *)entry_->patched_addr;
#if defined(TARGET_ARCH_ARM)
  if (entry_->thumb_mode) {
    buffer = (void *)((addr_t)buffer + 1);
  }
#endif
  GenRelocateCodeAndBranch(buffer, origin_, relocated_);
  if (relocated_->size == 0) {
    ERROR_LOG("[insn relocate]] failed");
    return false;
  }

  // set the relocated instruction address
  entry_->relocated_addr = relocated_->addr;

  // save original prologue
  memcpy((void *)entry_->origin_insns, (void *)origin_->addr, origin_->size);
  entry_->origin_insn_size = origin_->size;

  // log
  DEBUG_LOG("[insn relocate] origin %p - %d", origin_->addr, origin_->size);
  log_hex_format((uint8_t *)origin_->addr, origin_->size);

  DEBUG_LOG("[insn relocate] relocated %p - %d", relocated_->addr, relocated_->size);
  log_hex_format((uint8_t *)relocated_->addr, relocated_->size);

  return true;
}

// source/InstructionRelocation/arm64/InstructionRelocationARM64.cc
void GenRelocateCode(void *buffer, CodeMemBlock *origin, CodeMemBlock *relocated, bool branch) {
  relo_ctx_t ctx = {0};

  ctx.buffer = ctx.buffer_cursor = (uint8_t *)buffer;
  ctx.buffer_size = origin->size;

  ctx.src_vmaddr = (addr_t)origin->addr;
  ctx.dst_vmaddr = (addr_t)relocated->addr;

  ctx.origin = origin;

  relo_relocate(&ctx, branch);

  relocated->reset(ctx.relocated->addr, ctx.relocated->size);
}

void GenRelocateCodeAndBranch(void *buffer, CodeMemBlock *origin, CodeMemBlock *relocated) {
  GenRelocateCode(buffer, origin, relocated, true);
}

int relo_relocate(relo_ctx_t *ctx, bool branch) {
  int relocated_insn_count = 0;

  TurboAssembler turbo_assembler_(0);
#define _ turbo_assembler_.

  auto relocated_buffer = turbo_assembler_.GetCodeBuffer();

  ......
  // update origin
  int new_origin_len = (addr_t)ctx->buffer_cursor - (addr_t)ctx->buffer;
  ctx->origin->reset(ctx->origin->addr, new_origin_len);

  // TODO: if last instr is unlink branch, ignore it
  if (branch) {
    CodeGen codegen(&turbo_assembler_);
    codegen.LiteralLdrBranch(ctx->origin->addr + ctx->origin->size);
  }

  // Bind all labels
  turbo_assembler_.RelocBind();

  // Generate executable code
  {
    auto code = AssemblyCodeBuilder::FinalizeFromTurboAssembler(&turbo_assembler_);
    ctx->relocated = code;
  }
  return 0;
}

// source/core/codegen/codegen-arm64.cc
void CodeGen::LiteralLdrBranch(uint64_t address) {
  auto turbo_assembler_ = reinterpret_cast<TurboAssembler *>(this->assembler_);
#define _ turbo_assembler_->

  auto label = RelocLabel::withData(address);
  turbo_assembler_->AppendRelocLabel(label);

  _ Ldr(TMP_REG_0, label);
  _ br(TMP_REG_0);

#undef _
}- 获取origin_func的前三行指令
- 设置entry的relocated_addr
- 保存origin_func的地址到entry的origin_insns属性上
- 设置origin_func的原始三条指令+lrd、br指令
到这里为止,对于指令的重定向都设置完了,接下来调用了Commit函数
// source/InterceptRouting/InterceptRouting.cpp
void InterceptRouting::Active() {
  auto ret = DobbyCodePatch((void *)entry_->patched_addr, trampoline_buffer_->GetBuffer(),
                            trampoline_buffer_->GetBufferSize());
  if (ret == -1) {
    ERROR_LOG("[intercept routing] active failed");
    return;
  }
  DEBUG_LOG("[intercept routing] active");
}

// source/Backend/UserMode/ExecMemory/code-patch-tool-posix.cc
PUBLIC int DobbyCodePatch(void *address, uint8_t *buffer, uint32_t buffer_size) {
#if defined(__ANDROID__) || defined(__linux__)
  int page_size = (int)sysconf(_SC_PAGESIZE);
  uintptr_t patch_page = ALIGN_FLOOR(address, page_size);
  uintptr_t patch_end_page = ALIGN_FLOOR((uintptr_t)address + buffer_size, page_size);

  // change page permission as rwx
  mprotect((void *)patch_page, page_size, PROT_READ | PROT_WRITE | PROT_EXEC);
  if (patch_page != patch_end_page) {
    mprotect((void *)patch_end_page, page_size, PROT_READ | PROT_WRITE | PROT_EXEC);
  }

  // patch buffer
  memcpy(address, buffer, buffer_size);

  // restore page permission
  mprotect((void *)patch_page, page_size, PROT_READ | PROT_EXEC);
  if (patch_page != patch_end_page) {
    mprotect((void *)patch_end_page, page_size, PROT_READ | PROT_EXEC);
  }

  addr_t clear_start_ = (addr_t)address;
  ClearCache((void *)clear_start_, (void *)(clear_start_ + buffer_size));
#endif
  return 0;
}
DobbyCodePatch是直接对于指令产生修改的函数,原理也很简单,因为内存页通常的权限都是可读权限,无法修改代码。因此需要在修改时通过mprotect修改内存页权限变成可读可写可执行,修改后再将原始权限写回完成对于代码的修改